Thursday, June 30, 2011

Global tooltips with PrimeFaces and qTip2

PrimeFaces uses jQuery qTip plugin in the version 1 for global tooltips which are applied to all HTML elements having title attribute. There is an issue with ajax updates - global tooltips with qTip1 are gone after an ajax update. An ajax update of any element having the title attribute causes disappearance of nice tooltip. Native tooltips are still here but they are very plain, not beautiful and not themes aware. The official statement from the PrimeFaces team - "known issue, won't be fixed for global ones at the moment". In this post you will see how to resolve this issue in the simple way. The first step is to upgrade the qTip plugin to qTip2 and write a component class. The component class extends PrimeFaces' one and overwrites all methods what tooltip's default values have been changed for.
@ResourceDependencies({
    @ResourceDependency(library="primefaces", name="jquery/jquery.js"),
    @ResourceDependency(library="primefaces", name="core/core.js"),
    @ResourceDependency(library = "css", name = "jquery.qtip.css"),
    @ResourceDependency(library = "js", name = "tooltip/jquery.qtip.js"),
    @ResourceDependency(library = "js", name = "tooltip/tooltip.js")
})
public class Tooltip extends org.primefaces.component.tooltip.Tooltip
{
    public java.lang.String getTargetPosition() {
        return (java.lang.String) getStateHelper().eval(PropertyKeys.targetPosition, "bottom right");
    }

    public java.lang.String getPosition() {
        return (java.lang.String) getStateHelper().eval(PropertyKeys.position, "top left");
    }

    public java.lang.String getShowEffect() {
        return (java.lang.String) getStateHelper().eval(PropertyKeys.showEffect, "fadeIn");
    }

    public java.lang.String getHideEffect() {
        return (java.lang.String) getStateHelper().eval(PropertyKeys.hideEffect, "fadeOut");
    }

    public java.lang.String getShowEvent() {
        return (java.lang.String) getStateHelper().eval(PropertyKeys.showEvent, "mouseenter");
    }

    public java.lang.String getHideEvent() {
        return (java.lang.String) getStateHelper().eval(PropertyKeys.hideEvent, "mouseleave");
    }    
}
jquery.qtip.js is a new qTip script placed under the folder webapp/resources/js/tooltip and the tooltip.js is our one. In the tooltip.js I use the jQuery .live() method playing together with qTip2. This method allows us to easily add qTips to certain elements on a page, even when updating the DOM and adding new elements.
PrimeFaces.widget.Tooltip = function(cfg) {
    this.cfg = cfg;
    var _self = this;

    if (this.cfg.global) {
        // Bind the qTip within the event handler
        jQuery('*[title]').live(this.cfg.show.event, function(event) {
            var extCfg = _self.cfg;
            // Show the tooltip as soon as it's bound
            extCfg.show.ready = true;
            jQuery(this).qtip(extCfg, event);
        });
    } else {
        jQuery(PrimeFaces.escapeClientId(this.cfg.forComponent)).qtip(this.cfg);
    }
}

// make tooltip theme aware
jQuery.fn.qtip.defaults.style.widget = true;
jQuery.fn.qtip.defaults.style.classes = "ui-tooltip-rounded ui-tooltip-shadow";
jQuery ThemeRoller integration is done by the last two lines. The last step is to extend PrimeFaces's TooltipRenderer (because tooltip API has been changed) and register then all stuff in the faces-config.xml
public class TooltipRenderer extends org.primefaces.component.tooltip.TooltipRenderer
{
    public void encodeEnd(FacesContext facesContext, UIComponent component) throws IOException {
        Tooltip tooltip = (Tooltip) component;

        // dummy markup for ajax update (not really necessary)
        ResponseWriter writer = facesContext.getResponseWriter();
        writer.startElement("span", tooltip);
        writer.writeAttribute("id", tooltip.getClientId(facesContext), "id");
        writer.endElement("span");

        encodeScript(facesContext, tooltip);
    }

    protected void encodeScript(FacesContext facesContext, org.primefaces.component.tooltip.Tooltip tp)
        throws IOException {
        Tooltip tooltip = (Tooltip) tp;
        ResponseWriter writer = facesContext.getResponseWriter();
        boolean global = tooltip.isGlobal();
        String owner = getTarget(facesContext, tooltip);

        writer.startElement("script", null);
        writer.writeAttribute("type", "text/javascript", null);

        writer.write("jQuery(function() {");
        writer.write(tooltip.resolveWidgetVar() + " = new PrimeFaces.widget.Tooltip({");
        writer.write("global:" + global);

        if (!global) {
            writer.write(",forComponent:'" + owner + "'");
            writer.write(",content:'");
            if (tooltip.getValue() == null) {
                renderChildren(facesContext, tooltip);
            } else {
                writer.write(ComponentUtils.getStringValueToRender(facesContext, tooltip).replaceAll("'", "\\\\'"));
            }
            writer.write("'");
        }

        writer.write(",show:{event:'" + tooltip.getShowEvent() + "',delay:" + tooltip.getShowDelay() + 
            ",effect:function(){jQuery(this)." + tooltip.getShowEffect() + "(" + tooltip.getShowEffectLength() + ");}}");
        writer.write(",hide:{event:'" + tooltip.getHideEvent() + "',delay:" + tooltip.getHideDelay() + 
            ",effect:function(){jQuery(this)." + tooltip.getHideEffect() + "(" + tooltip.getHideEffectLength() + ");}}");
        writer.write(",position: {");
        String container = owner == null ? 
            "jQuery(document.body)" : "jQuery(PrimeFaces.escapeClientId('" + owner + "')).parent()";
        writer.write("container:" + container);
        writer.write(",at:'" + tooltip.getTargetPosition() + "'");
        writer.write(",my:'" + tooltip.getPosition() + "'");
        writer.write("}});});");

        writer.endElement("script");
    }
}
Have much fun! In one of my next post I will explain how to show a nice tooltip attached to the PrimeFaces Autocomplete component if user input disallowed characters.

Edit: I think a binding with namespace would be better to avoid collisions. Furthermore, a call of .die() before .live() is necessary in order to prevent miltiply binding of the same event if the tooltip gets updated via ajax. The same is for non global tooltips
jQuery('*[title]').die(this.cfg.show.event + ".tooltip").live(this.cfg.show.event + ".tooltip", ...
    ...
});

... in else ...

// delete previous tooltip to support ajax updates and create a new one
jQuery(PrimeFaces.escapeClientId(this.cfg.forComponent)).qtip('destroy').qtip(this.cfg);
The container element which the tooltip is appended to should be always document.body in order to play nice with layout, datatable, etc. Changes in TooltipRenderer.java:
writer.write("container:jQuery(document.body)");

Wednesday, June 8, 2011

Client-side validation with jQuery validation plugin. Advanced examples.

In the last post I covered the basics of the great jQuery validation plugin - state-of-the-art for client-side validation. I'm going to show now an advanced example how to write validation rules, own validation methods and put all together. I'm writing a collaborative whiteboard just now and needed two dialogs placed in the same HTML form. My task were:

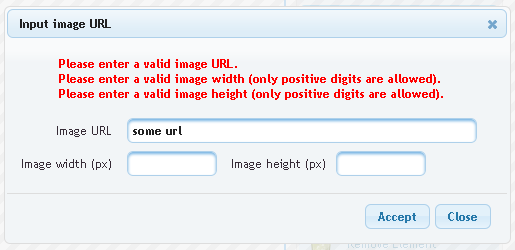
1) Write a dialog to input a valid image URL, image width and height. This dialog looks as follows


and was written in JSF (PrimeFaces) as
<p:dialog id="dialogInputImage" header="Input image URL" resizable="false" closable="true" modal="true" styleClass="validatable">
    <ul id="errorImageUl" class="errormsg"/>
    <h:panelGrid id="dlgImageGrid" columns="2" columnClasses="...">
        <h:outputLabel value="Image URL" for="inputUrl"/>
        <p:inputText id="inputUrl"/>
        <h:outputLabel value="Image width (px)" for="imgWidth"/>
        <h:panelGroup>
            <p:inputText id="imgWidth" maxlength="4"/>
            <h:outputLabel value="Image height (px)" for="imgHeight" style="margin: 0 10px 0 10px;"/>
            <p:inputText id="imgHeight" maxlength="4"/>
        </h:panelGroup>
    </h:panelGrid>
</p:dialog>

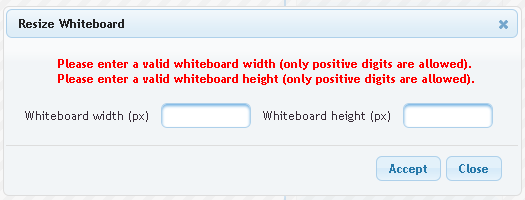
2) Write a second dialog with input fields for whiteboard width and height. This dialog looks as follows


and was written in JSF (PrimeFaces) as
<p:dialog id="dialogResize" header="Resize Whiteboard" resizable="false" closable="true" modal="true" styleClass="validatable">
    <ul id="errorResizeUl" class="errormsg"/>
    <h:panelGrid id="dlgResizeGrid" columns="4" columnClasses="...">
        <h:outputLabel value="Whiteboard width (px)" for="wbWidth"/>
        <p:inputText id="wbWidth" maxlength="4"/>
        <h:outputLabel value="Whiteboard height (px)" for="wbHeight"/>
        <p:inputText id="wbHeight" maxlength="4"/>
    </h:panelGrid>
</p:dialog>

3) Validation requirements:

First dialog.
- If nothing was input (all fields are empty) ==> no validation for all fields.
- If the URL field is empty ==> no validation for all fields.
- If the URL field is not empty ==> check if the URL is valid and input image width / height are positive digits (greater than 0).

Second dialog.
- Always check input width and height which should be positive digits (greater than 0).

Furthermore, error messages should be groupped. I use "errorPlacement" option for this. We need an error container to play nice with "errorPlacement". Therefore, I defined an error container in each dialog by UL element which will contain LI elements if any errors occur.
 
<ul id="..." class="errormsg"/>
 
Let me show the JavaScript part now. Comments help to understand the logic behind my code. The code should be placed after all p:dialog tags
jQuery(function() {
    // add a new validation method to validate image width / height
    jQuery.validator.addMethod("imageSize", function(value, element, param) {
        // check parameter "#inputUrl:filled" (see validate(...) method below) 
        if (jQuery.find(param).length < 1) {
            return true;
        }

        // use built-in "digits" validator and check if digits are positive
        return !this.optional(element) && jQuery.validator.methods['digits'].call(this, value, element) && parseInt(value) > 0;
    }, "Please enter a valid image size (only positive digits are allowed).");

    // create an object with rules for convenience (using in validate(...))
    var dimensionRules = {
        required: true,
        digits: true,
        min: 1
    };

    // create a validator with rules for all dialog fields
    dialogValidator = jQuery("#mainForm").validate({
        // validation is on demand ==> set onfocusout and onkeyup validation to false
        onfocusout: false,
        onkeyup: false,
        errorPlacement: function(label, elem) {
            elem.closest(".validatable").find(".errormsg").append(label);
        },
        wrapper: "li",
        rules: {
            inputUrl: {
                url: true
            },
            imgWidth: {
                // validation of image size depends on input URL - validate size for not empty URL only
                imageSize: "#inputUrl:filled"
            },
            imgHeight: {
                // validation of image size depends on input URL - validate size for not empty URL only
                imageSize: "#inputUrl:filled"
            },
            wbWidth: dimensionRules,
            wbHeight: dimensionRules
        },
        messages: {
            // define validation messages
            inputUrl: "Please enter a valid image URL.",
            imgWidth: "Please enter a valid image width (only positive digits are allowed).",
            imgHeight: "Please enter a valid image height (only positive digits are allowed).",
            wbWidth: "Please enter a valid whiteboard width (only positive digits are allowed).",
            wbHeight: "Please enter a valid whiteboard height (only positive digits are allowed)."
        }
    });

    // configure the first dialog
    jQuery("#dialogInputImage").dialog("option", "buttons", {
        "Accept": function() {
            // validate all fields if user click on the "Accept" button
            var isValid1 = dialogValidator.element("#inputUrl");
            var isValid2 = dialogValidator.element("#imgWidth");
            var isValid3 = dialogValidator.element("#imgHeight");

            if ((typeof isValid1 !== 'undefined' && !isValid1) || (typeof isValid2 !== 'undefined' && !isValid2) ||
               (typeof isValid3 !== 'undefined' && !isValid3)) {
                // validation failed
                return false;
            }

            // do something ...
        },
        "Close": function() {
            jQuery(this).dialog("close");
        }
    }).bind("dialogclose", function(event, ui) {
        // reset input
        jQuery(this).find("#inputUrl").val('');
        // clean up validation messages
        jQuery("#errorImageUl").html('');
    });

    // configure the second dialog
    jQuery("#dialogResize").dialog("option", "buttons", {
        "Accept": function() {
            // validate all fields if user click on the "Accept" button
            var isValid1 = dialogValidator.element("#wbWidth");
            var isValid2 = dialogValidator.element("#wbHeight");

            if ((typeof isValid1 !== 'undefined' && !isValid1) || (typeof isValid2 !== 'undefined' && !isValid2)) {
                // validation failed
                return false;
            }

            // do something ...

            jq.dialog("close");
            
            // do something ...
        },
        "Close": function() {
            jQuery(this).dialog("close");
        }
    }).bind("dialogclose", function(event, ui) {
        // clean up validation messages
        jQuery("#errorResizeUl").html('');
    });
});
Validation looks now as follows


 In fact I already implemented partially client-side validation as JSF components ;-).

Saturday, June 4, 2011

Client-side validation with jQuery validation plugin. Basic concepts.

jQuery validation plugin is my favorite framework for client-side validation. I'm surprised more and more about its power and flexibility. Before I start to describe my recently task for client-side validation I would like to say few words how this plugin works at all. jQuery validation plugin has a predefined set of validation methods for required fields, emails, URLs, credit card, numbers, dates, etc. All bundled methods come with default error messages in english and translations into 32+ languages. By default, error messages are displayed after the invalid element, but this is also customizable. It is also possible to put them into an error container at some other places and show them bundled all together. Desired validation methods can be specified in two ways:

1) By HTML "class" attribute.
2) By rules in JavaScript.

The first way is simple. Assume, you have a form with Id "registerForm" containing fields "Name" and "E-mail". Both fields should be required. In additional, the field "Name" requires minimum 3 letters and the field "E-mail" accepts only valid e-mail inputs.
<form id="registerForm" method="get" action="...">
    <label for="name">Name</label>
    <input id="name" name="name" size="25" class="required" minlength="3" />
    <label for="email">E-Mail</label>
    <input id="email" name="email" size="25" class="required email" />
</form>
Validation methods are specified here by "class" attributes. The form can be validated now by the call
 
jQuery("#registerForm").validate();
 
How does this plugin behave? By default, forms are validated on submit, triggered by the user clicking the submit button or pressing enter when a form input is focused. There is also validation on single elements on demand.
var validator;

jQuery(document).ready(function(){
     validator = jQuery("#registerForm").validate();
     ...
     doSomething();
});

function doSomething() {
    var isNameValid = validator.element("#name");
    if (isNameValid) {
        // do something
        ...
    }
}
The call validator.element("#name") above validates a single field "Name" and returns true if it is valid, false otherwise.

Before submitting the form for the first time the validation is lazy. The user can tab through fields without getting annoying messages. He has a chance to correct input values. Once a field was marked invalid, it is eagerly validated. The plugin validates on keyup if the user types something. When the user enters something invalid into a valid field, it is also validated when the field loses focus (onblur). In addition, a field can be highlighted as invalid. As soon as the user entered the necessary value, the error message is removed.

I prefer the second way - validation by rules definitions via JavaScript. This is more flexible and leaves nothing to be desired - there are many configuration parameters. Rules and messages can be configured in the validate(...) method. Each rule specifies Id of the field to be validated and desired validation methods for this field.
jQuery("#registerForm").validate({
    rules: {
        name: {
            required: true,
            minlength: 3
        },
        email: {
            required: true,
            email: true
        }
    },
    messages: {
        name: "Please enter a valid name.",
        email: "Please enter a valid e-mail."
    }
});
Rules can be added dynamically too after validate() was called. Like this one for the field with Id "name" above.
 
jQuery("#name").rules("add", {minlength: 3});
 
Validation methods can be grouped as one. For example if you want to group all three built-in validation methods "required", "date" and "dateRange", you can write
jQuery.validator.addClassRules({
    requiredDateRange: {required:true, date:true, dateRange:true}
});
The new validation method is called now "requiredDateRange". Another nice feature - overwriting of default messages. Example for "required" and "date" validations:
jQuery.extend(jQuery.validator.messages, {
    required: "These fields are required",
    date: "Please specify valid dates"
});
Last but not least - adding of new validation methods by
 
jQuery.validator.addMethod(name, method, [message]);
 
In the next post I will show an example for jQuery.validator.addMethod and more other advanced tricks. Stay tuned.