Thursday, September 29, 2011

Atmosphere and JSF are good friends

Decision to write this long article was driven by PrimeFaces community. People have troubles to develop web applications with server push techniques. Even with Atmosphere - framework for building portable Comet and WebSocket based applications. Portable means it can run on Tomcat, JBoss, Jetty, GlassFish or any other application server which supports Servlet specification 2.5 or higher. If you want to be independent on underlying server and don't want to have headaches during implementation, use Atmosphere framework. It simplifies development and can be easy integrated into JSF or any other web frameworks (don't matter). I read Atmosphere doesn't play nice with JSF or similar. PrimeFaces had a special Athmosphere handler for JSF in 2.2.1. But that's all is not necessary. It doesn't matter what for a web framework you use - the intergration is the same. My intention is to show how to set up a bidirectional communication between client and server by using of Atmosphere. My open source project "Collaborative Online-Whiteboard" demonstrates that this approach works well for all three transport protocols - Long-Polling, Streaming and WebSocket. This is an academic web application built on top of the Raphaël / jQuery JavaScript libraries, Atmosphere framework and PrimeFaces. You can open two browser windows (browser should support WebSocket) and try to draw shapes, to input text, to paste image, icon, to remove, clone, move elements etc.


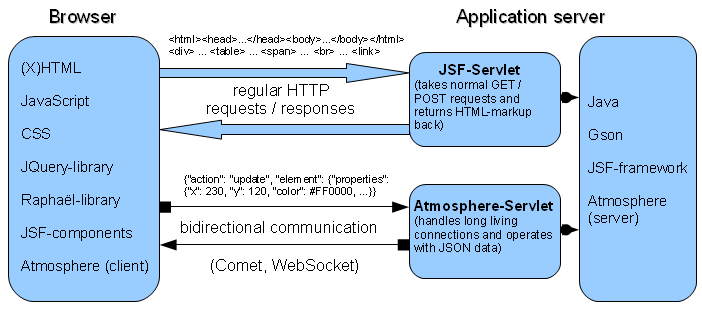
We need a little theory at first. For bidirectional communication we need to define a Topic at first (called sometimes "channel"). Users subscribe to the Topic and act as Subscribers to receive new data (called updates or messages as well). A subscriber acts at the same time as Publisher and can send data to all subscribers (broadcasting). Topic can be expressed by an unique URL - from the technical point of view. URL should be specified in such a manner that all bidirectional communication goes through AtmosphereServlet. JSF requests should go through FacesServlet. This is a very important decision and probably the reason why Atmosphere integration in various web frameworks like JSF and Struts sometimes fails. Bidirectional communication should be lightweight and doesn't run all JSF lifecycle phases! This can be achieved by proper servlet-mapping in web.xml. The picture below should demonstrate the architecture (example of my open source project).


For my use case I need messages in JSON format, but generally any data can be passed over bidirectional channel (XML, HTML). What is the Topic exactly? It depends on web application how you define the Topic. You can let user types it self (e.g. in chat applications) or make it predefined. In my application I equate Topic with Whiteboard-Id which is generated as UUID. Furthermore, I have introduced User-Id (= Publisher-Id) as well and called it Sender. Sender serves as identificator to filter Publisher out of all Subscribers. Publisher is normally not interested in self notification. I'm going to show using of Sender later. My Topic-URL follows this pattern
http://host:port/pubsub/{topic}/{sender}.topic
and looks like e.g. as
http://localhost:8080/pubsub/ea288b4c-f2d5-467f-8d6c-8d23d6ab5b11/e792f55e-2309-4770-9c48-de75354f395d.topic
I use Atmosphere with Jersey I think it's a better way than to write Atmosphere handlers or try to integrate MeteorServlet. Therefore, to start using of Atmosphere, you need a dependency to current Atmosphere and Jersey. Below is a dependency configuration for Maven users. Note: I cut logging off.
<dependency>
    <groupId>org.atmosphere</groupId>
    <artifactId>atmosphere-jersey</artifactId>
    <version>0.8-SNAPSHOT</version>
    <exclusions>
        <exclusion>
            <groupId>org.atmosphere</groupId>
            <artifactId>atmosphere-ping</artifactId>
        </exclusion>
        <exclusion>
            <groupId>org.slf4j</groupId>
            <artifactId>slf4j-api</artifactId>
        </exclusion>
    </exclusions>
</dependency>
<dependency>
    <groupId>org.apache.geronimo.specs</groupId>
    <artifactId>geronimo-servlet_3.0_spec</artifactId>
    <version>1.0</version>
</dependency>
<dependency>
    <groupId>org.slf4j</groupId>
    <artifactId>slf4j-api</artifactId>
    <version>1.6.2</version>
</dependency>
<dependency>
    <groupId>org.slf4j</groupId>
    <artifactId>slf4j-nop</artifactId>
    <version>1.6.2</version>
</dependency>
The next step is to add Atmosphere-jQuery plugin to the client side. This plugin can be downloaded from the Atmosphere's homepage. After placing jquery.atmosphere.js under webapp/resources/js you can include it with
<h:outputScript library="js" name="jquery.atmosphere.js" target="head"/>
Yes, I know that Atmosphere can load jquery.atmosphere.js from JAR file in classpath, but a manual include is better in JSF environment. Now we are able to subscribe to the Topic and communicate with the server on the client side. There are two calls: jQuery.atmosphere.subscribe() and jQuery.atmosphere.response.push(). To establish a bidirectional communication, you need to call subscribe(). You have to call this method just once when page has been loaded. After that the method push() is responsible for data publushing to all subsribers. In the mentioned above web application I have an JavaScript object WhiteboardDesigner which encapsulates the Atmosphere's subscribe() call in the method subscribePubSub().
// Subscribes to bidirectional channel.
// This method should be called once the web-application is ready to use.
this.subscribePubSub = function() {
  jQuery.atmosphere.subscribe(
    this.pubSubUrl,
    this.pubSubCallback,
    jQuery.atmosphere.request = {
      transport: this.pubSubTransport,
      maxRequest: 100000000
    });
    
    this.connectedEndpoint = jQuery.atmosphere.response;
}
The first parameter this.pubSubUrl is the shown above Topic-URL. The second parameter this.pubSubCallback is the callback function. The third parameter is the request configuration which keeps among other things transport protocol defined in this.pubSubTransport: "long-polling", "streaming" or "websocket". The last line assigns jQuery.atmosphere.response the variable this.connectedEndpoint which allows us data publishing via push(). So now when new data being received, the callback function this.pubSubUrl gets called. Inside of the callback we can extract received data from response object. You can get the idea how to handle broadcasted data from my example:
// Callback method defined in the subscribePubSub() method.
// This method is always called when new data (updates) are available on server side.
this.pubSubCallback = function(response) {
  if (response.transport != 'polling' &&
      response.state != 'connected' &&
      response.state != 'closed' && response.status == 200) {
      var data = response.responseBody;
      if (data.length > 0) {
        // convert to JavaScript object
        var jsData = JSON.parse(data);

       // get broadcasted data
        var action = jsData.action;
        var sentProps = (jsData.element != null ? jsData.element.properties : null);
        switch (action) {
          case "create" :
            ...
            break;
          case "update" :
            ...
            break;
          case "remove" :
            ...
            break;
          ... 
          default :
        }
        ...
      }
  }
}
To publish data over the Topic-URL you need to call this.connectedEndpoint.push(). this.connectedEndpoint is a defined above shortcut for jQuery.atmosphere.response. I call it in my example for created whiteboard elements as follows (just an example):
// Send changes to server when a new image was created.
this.sendChanges({
  "action": "create",
  "element": {
    "type": "Image",
    "properties": {
      "uuid": ...,
      "x": ...,
      "y": ...,
      "url": ...,
      "width": ...,
      "height": ...
    }
  }
});

// Send any changes on client side to the server.
this.sendChanges = function(jsObject) {
  // set timestamp
  var curDate = new Date();
  jsObject.timestamp = curDate.getTime() + curDate.getTimezoneOffset() * 60000;

  // set user
  jsObject.user = this.user;

  // set whiteboard Id
  jsObject.whiteboardId = this.whiteboardId;

  var outgoingMessage = JSON.stringify(jsObject);

  // send changes to all subscribed clients
  this.connectedEndpoint.push(this.pubSubUrl, null, jQuery.atmosphere.request = {data: 'message=' + outgoingMessage});
}
Passed JavaScript object jsObject is converted to JSON via JSON.stringify(jsObject) befor it's sending to the server.

What is necessary on the server side? Calls jQuery.atmosphere.subscribe() and jQuery.atmosphere.response.push() have to be caught on the server side. I use Jersey and its annotations to catch GET- / POST-requests for the certain Topic-URL in a declarative way. For that are responsible annotations @GET, @POST und @PATH. I have developed the class WhiteboardPubSub to catch the Topic-URL by means of @Path("/pubsub/{topic}/{sender}"). With @GET annotated method subscribe() catches the call jQuery.atmosphere.subscribe(). This method tells Atmosphere to suspend the current request until an event occurs. Topic (= Broadcaster) is also created in this method. Topic-String is extracted by the annotation @PathParam from the Topic-URL. You can imagine a Broadcaster as a queue. As soon as a new message lands in the queue all subscribers get notified (browsers which are connected with Topic get this message). With @POST annotated method publish() catches the call jQuery.atmosphere.response.push(). Client's data will be processed there and broadcasted to all subscribed connections. This occurs independent from the underlying transport protocol.
@Path("/pubsub/{topic}/{sender}")
@Produces("text/html;charset=ISO-8859-1")
public class WhiteboardPubSub
{
  private @PathParam("topic") Broadcaster topic;

  @GET
  public SuspendResponse<String> subscribe() {
    return new SuspendResponse.SuspendResponseBuilder<String>().
               broadcaster(topic).outputComments(true).build();
  }

  @POST
  @Broadcast
  public String publish(@FormParam("message") String message,
                      @PathParam("sender") String sender,
                      @Context AtmosphereResource resource) {
    // find current sender in all suspended resources and
    // remove it from the notification
    Collection<AtmosphereResource<?, ?>> ars = topic.getAtmosphereResources();
    if (ars == null) {
      return "";
    }

    Set<AtmosphereResource<?, ?>> arsSubset = new HashSet<AtmosphereResource<?, ?>>();
    HttpServletRequest curReq = null;
    for (AtmosphereResource ar : ars) {
      Object req = ar.getRequest();
      if (req instanceof HttpServletRequest) {
        String pathInfo = ((HttpServletRequest)req).getPathInfo();
        String resSender = pathInfo.substring(pathInfo.lastIndexOf('/') + 1);
        if (!sender.equals(resSender)) {
          arsSubset.add(ar);
        } else {
          curReq = (HttpServletRequest) req;
        }
      }
    }

    if (curReq == null) {
      curReq = (HttpServletRequest) resource.getRequest();
    }

    // process current message (JSON) and create a new one (JSON) for subscribed clients
    String newMessage = WhiteboardUtils.updateWhiteboardFromJson(curReq, message);

    // broadcast subscribed clients except sender
    topic.broadcast(newMessage, arsSubset);

    return "";
  }
}
In my case the method publish() looks for sender (= publisher of this message) among all subscribers and removes it from the notification. It looks a little bit complicated. In simple case you can write
@POST
@Broadcast
public Broadcastable publish(@FormParam("message") String message) {
  return new Broadcastable(message, "", topic);
}
and that's all! The last step is the mentioned above configuration in web.xml. *.jsf requests should be mapped to FacesServlet and *.topic requests to AtmosphereServlet. AtmosphereServlet can be configured comprehensively. Important configuration parameter is com.sun.jersey.config.property.packages. With this parameter you can tell Jersey where the annotated class is located (in my case WhiteboardPubSub). In my example Jersey scans the directory com.googlecode.whiteboard.pubsub.
<!-- Faces Servlet -->
<servlet>
  <servlet-name>Faces Servlet</servlet-name>
  <servlet-class>javax.faces.webapp.FacesServlet</servlet-class>
  <load-on-startup>1</load-on-startup>
</servlet>
<servlet-mapping>
  <servlet-name>Faces Servlet</servlet-name>
  <url-pattern>*.jsf</url-pattern>
</servlet-mapping>

<!-- Atmosphere Servlet -->
<servlet>
  <description>AtmosphereServlet</description>
  <servlet-name>AtmosphereServlet</servlet-name>
  <servlet-class>org.atmosphere.cpr.AtmosphereServlet</servlet-class>
  <init-param>
    <param-name>com.sun.jersey.config.property.resourceConfigClass</param-name>
    <param-value>com.sun.jersey.api.core.PackagesResourceConfig</param-value>
  </init-param>
  <init-param>
    <param-name>com.sun.jersey.config.property.packages</param-name>
    <param-value>com.googlecode.whiteboard.pubsub</param-value>
  </init-param>
  <init-param>
    <param-name>org.atmosphere.useWebSocket</param-name>
    <param-value>true</param-value>
  </init-param>
  <init-param>
    <param-name>org.atmosphere.useNative</param-name>
    <param-value>true</param-value>
  </init-param>
  <init-param>
    <param-name>org.atmosphere.cpr.WebSocketProcessor</param-name>
    <param-value>org.atmosphere.cpr.HttpServletRequestWebSocketProcessor</param-value>
  </init-param>
  <init-param>
    <param-name>org.atmosphere.cpr.broadcastFilterClasses</param-name>
    <param-value>org.atmosphere.client.JavascriptClientFilter</param-value>
  </init-param>
  <load-on-startup>2</load-on-startup>
</servlet>
<servlet-mapping>
  <servlet-name>AtmosphereServlet</servlet-name>
  <url-pattern>*.topic</url-pattern>
</servlet-mapping>
Please check Atmosphere documentation and showcases for more information.

Summary: We have seen that few things are needed to establish the bidirectional comminication: Topic-URL, callback function for data receiving, subsribe() und push() methods on client side, an Jersey class on server side and configuration in web.xml to bind all parts together. JSF- und Atmosphere-requests should be treated separately. You maybe ask "but what is about the case if I need to access JSF stuff in Atmosphere-request?" For a simple case you can use this technique to access managed beans. If you want to have a fully access to all JSF stuff you should use this technique which allows accessing FacesContext somewhere from the outside.

P.S. Good news. Atmosphere's lead Jeanfrancois Arcand announced his intention to pursue the work on Atmosphere. He can invest more time now in his great framework.

Tuesday, September 27, 2011

Quick practical introduction to JSDoc (JsDoc Toolkit)

Documentation of JavaScript code is a very important part of software development and helps front-end developers to understand code of third-party libraries. There are really well documented libraries. One of them is Mojarra JavaScript documentation. Other libraries (and that's a common case) don't have JavaScript documentation at all or don't cover all their features, so that features stay undocumented (I hope PrimeFaces guys read this blog post :-)).

JSDoc is documentation generated for JavaScript code by means of JsDoc Toolkit. Documentation is not restricted to multi-page HTML, other formats are possible too. Look-&-feel can be fully customized by templates. In this quick introduction I use built-in templates and would like to show generated JSDoc on example of my open source project "Collaborative Online-Whiteboard". I use following tags in my example:

@fileOverview
This tag allows you to provide documentation for an entire file. It's often used with other tags @author and @version.
@class
This tag also allows you to add a description of the JavaScript class (if you write your code in OOP style).
@param
This tag allows you to document information about the parameters to a function, method or class (constructor)
@public
This tag allows you to document public methods or variables.
@private
This tag allows you to document private methods or variables.
@type
This tag allows you to document the type of value a variable refers to, or the type of value returned by a function.
@returns
This tag documents the value returned by a function or method. You can specify a type of the returned value in curly braces {...}.
@link
This tag allows you to create a HTML link to some other documented symbol (similar link in JavaDoc).

Let's document the JavaScript code! I have a class called WhiteboardDesigner which expects 5 parameters (to be passed to constructor) and has many public / private methods. The documented class looks like
/**
* @fileOverview
* @author <a href="mailto:ovaraksin@googlemail.com">Oleg Varaksin</a>
* @version 0.2
*/

/**
* Whiteboard designer class for element drawing.
* @class
* @param witeboardConfig whiteboard's configuration {@link WhiteboardConfig}
* @param whiteboardId whiteboard's id
* @param user user (user name) working with this whiteboard
* @param pubSubUrl URL for bidirectional communication
* @param pubSubTransport transport protocol "long-polling" | "streaming" | "websocket"
*/
WhiteboardDesigner = function(witeboardConfig, whiteboardId, user, pubSubUrl, pubSubTransport) {
    /**
     * Whiteboard's configuration {@link WhiteboardConfig}.
     * @public
     * @type WhiteboardConfig
     */
    this.config = witeboardConfig;
    /**
     * Whiteboard's id.
     * @public
     * @type uuid
     */    
    this.whiteboardId = whiteboardId;
    /**
     * User which works with this whiteboard.
     * @public
     * @type string
     */    
    this.user = user;
    /**
     * URL for bidirectional communication.
     * @public
     * @type string
     */    
    this.pubSubUrl = pubSubUrl;
    /**
     * Transport protocol "long-polling" | "streaming" | "websocket".
     * @public
     * @type string
     */    
    this.pubSubTransport = pubSubTransport;
    /**
     * Logging flag, true - logging is visible, false - otherwise.
     * @public
     * @type boolean
     */    
    this.logging = false;
    /**
     * Raphael's canvas.
     * @private
     * @type Raphael's paper
     */    
    var paper = Raphael(this.config.ids.whiteboard, whiteboard.width(), whiteboard.height());
    
    ...
    
    /** Draws image with default properties.
    * @public
    * @param inputUrl image URL.
    * @param width image width.
    * @param height image height.
    */    
    this.drawImage = function(inputUrl, width, height) {
        ...
    }
    
    /** Gets currently selected whiteboard element.
    * @public
    * @returns {Raphael's element} currently selected element
    */
    this.getSelectedObject = function() {
        ...
    }

    ...

    /** Outputs debug messages.
    * @private
    * @param msg message
    */
    var logDebug = function(msg) {
        ...
    }
}
How to generate a documentation now? I would like to show a quick and simple way. Download JsDoc Toolkit zip file at first. Extract it and go to the directory jsdoc-toolkit. Create there a new folder with any name which will contain your documented JavaScript files. I have created a folder called "whiteboard". Copy all JavaScript files into this folder. Open a DOS console or Linux terminal or whatever at jsdoc-toolkit and type
 
java -jar jsrun.jar app/run.js -a -p -t=templates/jsdoc ./<yours folder name>/*.*
 
In my case it's
 
java -jar jsrun.jar app/run.js -a -p -t=templates/jsdoc ./whiteboard/*.*
 
JsDoc Toolkit runs via the Mozilla JavaScript Engine "Rhino." Rhino is wrapped in a runner application called jsrun. Option -a says: include all functions, even undocumented ones. Option -p says: include symbols tagged as private, underscored and inner symbols (such symbols are not included per default). Option -t is required und used to point to templates for output formatting. Using of default build-in templates which are located under templates/jsdoc is satisfying in most cases.

After script running you will find generated files in the out folder. Entry file is index.html. Its location is .../jsdoc-toolkit/out/index.html You can see online here how does it look for my project. Have much fun!

Friday, September 16, 2011

Inheritance in Maven based web projects

Sometimes you want to define a base web project and reuse all web based stuff in all other web projects. This is not rare in big projects. The first thought coming in mind is inheritance. Is there any inheritance between web projects at all? Yes, in a manner of speaking. In Maven based projects there is a nice "overlay" feature for maven-war-plugin. You can point to the base WAR project in the overlay tag and the base project gets extracted bevor it's stuff will be extended or overwritten by inherited project. An example:
<plugin>
    <artifactId>maven-war-plugin</artifactId>
    ...
    <configuration>
        <overlays>
            <overlay>
                <groupId>ip.client</groupId>
                <artifactId>ip-theme-framework</artifactId>
                <classifier>webapp</classifier>
                <excludes>
                    <exclude>META-INF/**</exclude>
                    <exclude>WEB-INF/web.xml</exclude>
                    <exclude>WEB-INF/lib/**</exclude>
                    <exclude>WEB-INF/classes/**</exclude>
                </excludes>
            </overlay>
        </overlays>
    </configuration>
</plugin>
You have also to add a dependency in your inherited project for the base project, of course. Well, this feature works fine, but there is a problem with transitive dependencies. Dependencies defined in the base project are "invisible" for inherited projects. You can not use transitive dependencies, they aren't going to be inherited. And adding of all dependencies again in inherited projects is error-prone and causes some issues during release management. To solve this problem, we can set packaging of all web projects as jar. That's what we do in my company.
<packaging>jar</packaging>
With packaging jar you have still a WAR archive at the end, but Java sources are packed to one jar file which is placed by Maven below WEB-INF/lib inside of the WAR. WEB-INF/classes stays empty. Dependencies get now accepted. One thing to keep in mind: WAR projects with packaging jar should be specified twice as dependencies. Once without <type> and once with <type>war</type>. An example:
<dependency>
    <groupId>ip.client</groupId>
    <artifactId>ip-theme-framework</artifactId>
</dependency>
<dependency>
    <groupId>ip.client</groupId>
    <artifactId>ip-theme-framework</artifactId>
    <classifier>webapp</classifier>
    <type>war</type>
    <scope>runtime</scope>
</dependency>
The last be not least is the support in IDEs. JAR projects are not recognized as web projects in Eclipse, IntelliJ or somewhere else and you lose all goodies from your preferred IDE. A solution is simple and uses profiles. Define a property ${packaging.war} for a special profile (see my last post).
<profile>
    <id>ide</id>
    <properties>
        <packaging.war>war</packaging.war>
    </properties>
</profile>
write variable packaging.war in the packaging tag of your project
<packaging>${packaging.war}</packaging>
and let Maven run with this profile when creating IDE specific files:
mvn -Pide eclipse:eclipse
mvn -Pide idea:idea
...
Summary: Overlays help to reuse web projects. They also help to customize web projects by having one big core project and many small custom specific projects which only have specific CSS, Images (logos, ect.) and messages in property files. Custom specific Maven projects don't have Java classes - the aim is to overwrite / extend resources of core project and achieve a custom Look-&-Feel.

Wednesday, September 14, 2011

Filter web.xml with Maven

Maven (build manager for Java projects) has a feature called "filtering". As is generally known you can replace with Maven any variables defined with placeholders like ${my.variable}. Such variables can be placed in property files or any other resource files like CSS, JavaScript, (X)HTML. I normally place placeholders in web.xml and replace them by real values while Maven runs with a certain profile. My default Maven profile is e.g. "development". Another profile is "release". To build artefacts with "release" profile I run
mvn -Prelease clean install
Option -P is for profile you want to build software with. How to set up filtering of web.xml exactly? At first we need to create a directory "filter" under "src/main" and place two (or more) property files under "src/main/filter". In order to demonstrate filtering for two profiles I'm going to create development.properties and release.properties. So, our structure looks now as follows:


Let us define the content of development.properties as
jsf.faceletsRefreshPeriod=2
jsf.resourceUpdateCheckPeriod=2
and the content of release.properties as
jsf.faceletsRefreshPeriod=-1
jsf.resourceUpdateCheckPeriod=-1
The next step is to modify web.xml. web.xml gets two placeholders:
...
<context-param>
    <param-name>javax.faces.FACELETS_REFRESH_PERIOD</param-name>
    <param-value>${jsf.faceletsRefreshPeriod}</param-value>
</context-param>
<context-param>
    <param-name>com.sun.faces.resourceUpdateCheckPeriod</param-name>
    <param-value>${jsf.resourceUpdateCheckPeriod}</param-value>
</context-param>
...
The last step is to modify pom.xml. Actually we don't need two profiles. Let us only define the "release" profile and assume default case without any profiles as "development".
<profiles>
    <profile>
        <id>release</id>
        <properties>
            <webapp.filter>release</webapp.filter>
        </properties>
    </profile>
</profiles>
Important thing is to define a property "webapp.filter" for "release" profile. For default case we have also to add this line to pom.xml (somewhere at the end):
<properties>
    <webapp.filter>development</webapp.filter>
</properties>
To make it working together with maven-war plugin (in this case) we need to activate filtering feature. That means, before WAR archive gets packed, placeholders in web.xml should be already replaced by real values from property files. This task is simple:
<plugin>
    <artifactId>maven-war-plugin</artifactId>
    <executions>
        <execution>
            <id>war</id>
            <phase>package</phase>
            <goals>
                <goal>war</goal>
            </goals>
            <configuration>
                ...
                <filteringDeploymentDescriptors>true</filteringDeploymentDescriptors>
                <filters>
                    <filter>${basedir}/src/main/filter/${webapp.filter}.properties</filter>
                </filters>
            </configuration>
        </execution>
    </executions>
</plugin>
We leverages here the variable ${webapp.filter} which points to file name depends on currently active profile. That's all. You can now run builds with
// build for development
mvn clean install

// build for release
mvn -Prelease clean install
There is only one issue when using Jetty Maven plugin and let it runs with
mvn jetty:run
Jetty looks as default under source directory and scans src/main/webapp/WEB-INF/web.xml. But located there web.xml has placeholders. How to solve that? A solution is easy. This is a bonus part of this post. We can leverages overrideDescriptor tag and specify a XML file with our own parts of web.xml which overwrite the same parts in src/main/webapp/WEB-INF/web.xml when Jetty running.
<plugin>
    <groupId>org.mortbay.jetty</groupId>
    <artifactId>maven-jetty-plugin</artifactId>
    <configuration>
        <webAppConfig>
            ...
            <overrideDescriptor>src/main/resources/overrideweb.xml</overrideDescriptor>
        </webAppConfig>
    </configuration>
</plugin>
The content of overrideweb.xml is (we normally need settings for default "development" profile when Jetty running)
<?xml version="1.0" encoding="UTF-8"?>
<web-app version="2.5"
         xmlns="http://java.sun.com/xml/ns/javaee"
         xmlns:xsi="http://www.w3.org/2001/XMLSchema-instance"
         xsi:schemaLocation="http://java.sun.com/xml/ns/javaee http://java.sun.com/xml/ns/javaee/web-app_2_5.xsd">

    <context-param>
        <param-name>javax.faces.FACELETS_REFRESH_PERIOD</param-name>
        <param-value>2</param-value>
    </context-param>
    <context-param>
        <param-name>com.sun.faces.resourceUpdateCheckPeriod</param-name>
        <param-value>2</param-value>
    </context-param>
    <context-param>
        <param-name>com.sun.faces.injectionProvider</param-name>
        <param-value>com.sun.faces.vendor.WebContainerInjectionProvider</param-value>
    </context-param>
    <context-param>
        <param-name>com.sun.faces.spi.AnnotationProvider</param-name>
        <param-value>com.sun.faces.config.AnnotationScanner</param-value>
    </context-param>
    
    <listener>
        <listener-class>com.sun.faces.config.ConfigureListener</listener-class>
    </listener>
</web-app>
Happy filtering!

Wednesday, September 7, 2011

Useful Maven commandos

Everybody who uses Maven from console / terminal knows how sometimes difficult to remember all handy commandos using in day job. A small reference list should help.

Skip running tests for a particular project.
mvn clean install -Dmaven.test.skip=true
Continue build if it has been failed at certain point. Maybe you have many sub-projects and build your entire project from top to down. "-rf" parameters allow to continue maven running where you want after any build errors. Assume my current top directory where I let Maven run is D:\SVN and the build was broken at D:\SVN\eIP\CoreServer\DatastoreConnector. Following command let go on with the build and skip this not compilable or not testable sub-project.
mvn clean install -rf eIP\CoreServer\DatastoreConnector
Get source jar files (e.g. for Eclipse projects). Having source files in local repository allow to jump into this directly from your preferred IDE.
mvn eclipse:eclipse -DdownloadSources=true
or run
mvn dependency:sources
to download all source jars for a given project into local repository. The same for JavaDoc (if it's available).
mvn eclipse:eclipse -DdownloadJavadocs=true
Output project's dependency tree. I like that! You can see versions of all used artefacts.
mvn dependency:tree
Output is like this one
[INFO] ip.client:ip-jsftoolkit:jar:3.4.1-SNAPSHOT
[INFO] +- ip.client:ip-filter-security:jar:3.4.0:compile
[INFO] |  +- com.scalaris.commons:scalaris-commons-enterprise:jar:2.3.1-SNAPSHOT:compile
[INFO] |  |  +- com.scalaris.commons:scalaris-commons-lang:jar:2.3.0:compile
[INFO] |  |  +- org.apache.commons:commons-lang3:jar:3.0:compile
[INFO] |  |  \- commons-lang:commons-lang:jar:2.6:compile
[INFO] |  +- ip.client:ip-client-commons:jar:3.4.0:compile
[INFO] |  |  +- ip.services:ip-core-services:jar:3.4.0:compile
[INFO] |  |  |  \- ip.datatransfer:ip-datatransfer-commons:jar:3.4.0:compile
..................................................
[INFO] |  +- commons-httpclient:commons-httpclient:jar:3.0.1:compile
[INFO] |  +- org.apache.commons:commons-jexl:jar:2.0:compile
[INFO] |  \- joda-time:joda-time:jar:1.6.2:compile
[INFO] +- javax.ejb:ejb:jar:3.0:provided
[INFO] +- javax.servlet:servlet-api:jar:2.5:provided
[INFO] \- com.scalaris.commons:scalaris-commons-test:jar:2.2.8-SNAPSHOT:test
[INFO]    +- jmock:jmock:jar:1.2.0:test
[INFO]    +- junit:junit:jar:3.8.2:test
Filter project's dependency tree in order to see only a specified dependency. The syntax for filter patterns is as follows: [groupId]:[artifactId]:[type]:[version]
mvn dependency:tree -Dincludes=com.sun.faces:jsf-impl
Display the effective pom of a project. The effective pom represents the current pom state for a project (incl. maven super pom and active profiles).
mvn help:effective-pom
Generate files needed for an IntelliJ IDEA project setup.
mvn idea:idea
This plugin has no way to determine the name of the JDK you are using. It uses by default the same JDK as output java -version. Using with defined JDK:
mvn idea:idea -DjdkName=1.5
Create a web project from scratch.
mvn archetype:create 
 -DarchetypeGroupId=org.apache.maven.archetypes 
 -DarchetypeArtifactId=maven-archetype-webapp 
 -DarchetypeVersion=1.0 
 -DgroupId=com.maventest 
 -DartifactId=mywebtest 
 -Dversion=1.0-SNAPSHOT
Deploy artefact in global repository (located e.g. in file://///xyz.abc.com/maven/repo-m2).
mvn deploy:deploy-file
 -DgroupId=com.maventest
 -DartifactId=mywebtest
 -Dversion=1.0-SNAPSHOT
 -Dpackaging=war
 -Dfile=mywebapp.jar
 -DrepositoryId=xyz-release 
 -Durl=file://///xyz.abc.com/maven/repo-m2
Check all the dependencies used in your project and display a list of those dependencies with newer versions available.
mvn versions:display-dependency-updates

...
[INFO] The following dependency updates are available:
[INFO]   org.apache.maven:maven-artifact ........................ 2.0 -> 2.0.9
[INFO]   org.apache.maven:maven-plugin-api ...................... 2.0 -> 2.0.9
[INFO]   org.apache.maven:maven-project ....................... 2.0.2 -> 2.0.9
[INFO]   org.codehaus.plexus:plexus-utils ....................... 1.1 -> 1.5.6
Check all the plugins and reports used in your project and display a list of those plugins with newer versions available.
mvn versions:display-plugin-updates

...
[INFO] The following plugin updates are available:
[INFO]   maven-deploy-plugin ...................................... 2.5 -> 2.7
[INFO]   maven-jar-plugin ..................................... 2.3.1 -> 2.3.2
[INFO]   maven-plugin-plugin ...................................... 2.7 -> 2.9
[INFO]   maven-resources-plugin ................................. 2.4.3 -> 2.5
Decompile Java classes in the maven central repository :-). Useful if source code isn't available. The trick is here.