Wednesday, October 30, 2013

What is your structure of JEE based web projects?

In this post I will try to discuss diverse organization structures of web based projects, mostly with JSF. The first thought when starting a new project is how to organize my Java packages? Imagine, you develop a web based user and group management system. A long time I used the following structure of Java packages which separates bean classes from model classes (model classes are sometimes called view helpers).


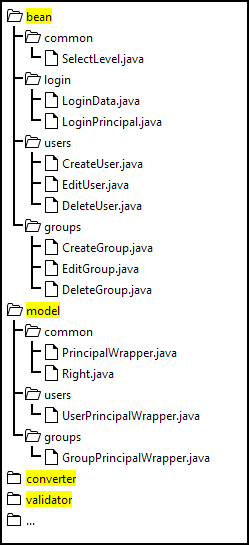
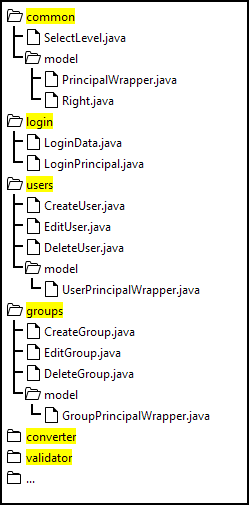
This is a good layout in my optinion, but it is not good enough if you have big projects. Why? Although some bean and model classes belong together, they are located far from each other. You have to navigate and scroll in your IDE between the bean and model packages. This can steal some time. Over the years I have realized that a grouping of classes according to their logical / semantic meaning may looks better. That means, model packages and classes are located in the same superordinated packages as beans they belong to. Common used beans and model classes can be placed in an extra package, say e.g. common.


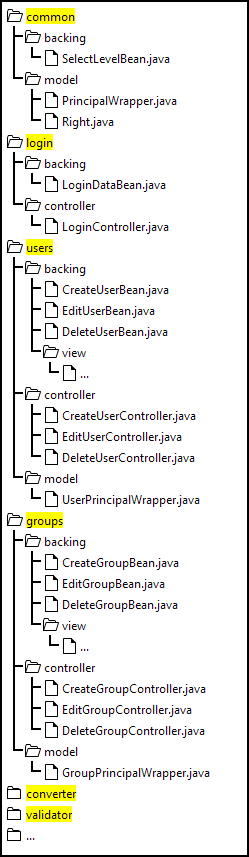
But be careful here. Some developers prefer to blow up the count of beans. If you follow strict the MVC-pattern, you need backing beans, controller beans and view interfaces, beans. Backing beans take responsibility for component, value binding and delegation of events. They delegate the business logic's execution to the controller beans. Controller beans communicate with the underlying backend system(s). This fine-tuned separation of concepts increases the testability of small software pieces, but it leads to many classes and can complicate the project's structure under some circumstances.


What is about web pages? Here there are more or less the same two approaches. The first one follows the approach described e.g. in this article. There are three main folders: templates, views and sections. Templates are facelets templates used on (almost) every page. Views are full pages. They are bound to URLs in browsers. Views use templates. Sections are small pieces on a page. Sections are included by views (think on ui:include). The structure looks as follows:


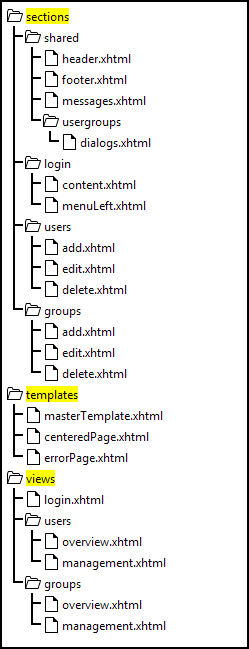
You also see here a folder shared which contains some common used stuff. Pages for users and groups include a common section dialogs.xhtml. It is placed below /sections/shared/usergroups. As I aleady said, I realized that the grouping of pages and sections, when they belong together, could be a better approach. So, the next structure has two main folders pages and templates. Sections are located under includes in the same superordinated folders as pages which include them.


The grouping looks more efficient now in terms of IDE's navigation. It is also clear what parts belongs together. In the last picture you also see that the folder usergroups contains sub-folders users, groups and the common includes shared on different pages in the context of user / group management.

What is your preferred structure? Share your thoughts. Any feedback is welcome.

Monday, October 14, 2013

Hot Deployment with IntelliJ IDEA

Recently there was a voting in the PrimeFaces forum PrimeFaces IDE Poll for the best IDE used to develop PrimeFaces applications. The most people voted for NetBeans. NetBeans and Eclipse are free IDEs. My favorite IDE IntelliJ IDEA Ultimate is not free and I think this is a reason why there are less people using it on the job. I thought it would be a good idea to show some nice features in IntelliJ. This post will demonstrate how to configure IntelliJ for the hot deployment when developing web projects. Hot deployment means you can change web resources or classes at runtime and the changes will be recognized immediately without server restart. An useful feature during development process. In the example, I will take the application server JBoss 7, but any other server can be configured in the same manner as well. A good introduction to IntelliJ and JBoss there is in the IntelliJ Wiki. For a general information regarding working with application servers in IntelliJ please refer this help page.

We assume, the application server is already configured. The next step is to configure an exploded WAR artifact for the web project. An exploded WAR is a decompressed web application archive, a directory structure that is ready for deployment on an application server. IntelliJ creates it automatically, but nevertheless, you should go to File --> Project Structure --> Artefacts and ensure that the exploded web application ends with the extension .war. If you use Maven, the exploded WAR is created below the target folder. More info on the help page.


You should also check if the Hot Swap is enabled. Go to the File --> Settings --> Debugger --> HotSwap and ensure that all checkboxes are checked and the radio button "Reload classes after compilation" is set to "Always".


As next step, click on the "Edit Configurations..." and go to the configured server. In the "Run/Debug Configurations" dialog, select "Update resources" in the drop-down "On frame deactivation". That means, when you switch to the browser, IntelliJ will copy resource files (JavaScript, CSS) from the source location (src/main/webapp) to the directory where it builds the exploded WAR to deploy.


Hot deployment for changed Java classes is resticted by JVM. E.g. the hot deployment for classes with changed method signature(s) doesn't work. But if you changed a method body, it will work. So, if you don't use JRebel which allows the hot deployment for classes being structurally modified, you can still rely on IntelliJ. All what you need to do for changes in Java classes is to recompile them. For that, you can go to the menu Build --> Compile or simple hit Ctrl + Shift + F9. After that, go to the browser and refresh the page to see changes.


Thursday, October 10, 2013

Pass JavaScript function via JSON. Pitfall and solution.

JSON is a lightweight data-interchange format. It is well readable and writable for humans and it is easy for machines to parse and generate. The most of JavaScript libraries, frameworks, plugins and whatever are configurable by options in JSON format. Sometimes you have to parse a JSON string (text) to get a real JavaScript object. For instance, sometimes you have to read the whole JSON structure from a file and make it available on the client-side as an JavaScript object. The JSON text should be well-formed. Passing a malformed JSON text results in a JavaScript exception being thrown.

What does "well-formed" mean? A well-formed JSON structure consists of data types string, number, object, array, boolean or null. Other data types are not allowed. An example:
{
    "name": "Max",
    "address": {
        "street": "Big Avenue 5",
        "zipcode": 12345,
        "country": "USA"
    },
    "age": 35,
    "married": true,
    "children": ["Mike", "John"]
}
You see here string values for keys "name", "street" and "country", number values for "zipcode" and "age", boolean value for "married", object for "address" and array for "children". But what is about JavaScript functions? Some scripts allow to pass functions as values. For instance as in some chart libraries:
{
    "margin": "2px",
    "colors": ["#FFFFFF", "CCCCCC"],
    "labelFormatter": function(value, axis) {return value + ' degree';}
}
If you try to parse this JSON text, you will face an error because function(value, axis) {return value + ' degree';} is not allowed here. Try to put this structure into this online JSON viewer to see that JSON format doesn't accept functions. So, the idea is to pass the function as string:
{
    "borderWidth": "2px",
    "colors": ["#FFFFFF", "CCCCCC"],
    "labelFormatter": "function(value, axis) {return value + ' degree';}"
}
This syntax can be parsed. But we have another problem now. We have to make a real JavaScript function from its string representation. After trying a lot I found an easy solution. Normally, to parse a well-formed JSON string and return the resulting JavaScript object, you can use a native JSON.parse(...) method (implemented in JavaScript 1.7), JSON.parse(...) from json2.js written by Douglas Crockford or the jQuery's $.parseJSON(...). The jQuery's method only expects one parameter, the JSON text: $.parseJSON(jsonText). So, you can not modify any values with it. The first two mentioned methods have two parameters
 
JSON.parse(text, reviver)
 
The second parameter is optional, but exactly this parameter will help us! reviver is a function, prescribes how the value originally produced by parsing is transformed, before being returned. More precise: the reviver function can filter and transform the results. It receives each of the keys and values, and its return value is used instead of the original value. If it returns what it received, then the structure is not modified. If it returns undefined then the member is deleted. An example:
var transformed = JSON.parse('{"p": 5}', function(k, v) {if (k === "") return v; return v * 2;});

// The object transformed is {p: 10}
In our case, the trick is to use eval in the reviver to replace the string value by the corresponding function object:
var jsonText = ".....";  // got from any source

var jsonTransformed = JSON.parse(jsonText, function (key, value) {
    if (value && (typeof value === 'string') && value.indexOf("function") === 0) {
        // we can only pass a function as string in JSON ==> doing a real function
        eval("var jsFunc = " + value);
        return jsFunc;
    }
         
    return value;
});
I know, eval is evil, but it doesn't hurt here. Well, who doesn't like eval there is another solution without it.
var jsonTransformed = JSON.parse(jsonText, function (key, value) {
    if (value && (typeof value === 'string') && value.indexOf("function") === 0) {
        // we can only pass a function as string in JSON ==> doing a real function
        var jsFunc = new Function('return ' + value)();
        return jsFunc;
    }
         
    return value;
});

Friday, October 4, 2013

PrimeFaces Extensions: drag-and-drop feature in Timeline

Since the last release of the PrimeFaces Extensions, the Timeline component allows dragging items from the outside (an external list, etc.) and dropping them onto the Timeline. The picture shows the dragging / dropping process.


When an item is dragged and dropped, an event with an end date will be created. The end date is the start date + 10% of the timeline width. This default algorithm fits the most use cases. Tip: if events are editable, you can adjust the start / end date later by double clicking on an event.

To activate the built-in drag-and-drop feature, simple add p:ajax with event="drop" to the timeline tag.
<div style="float:left;">
    <strong>Drag and drop events</strong>
    <p/>
    <p:dataList id="eventsList" value="#{dndTimelineController.events}"
                var="event" itemType="circle">
        <h:panelGroup id="eventBox" layout="box" style="z-index:9999; cursor:move;">
            #{event.name}
        </h:panelGroup>
        
        <p:draggable for="eventBox" revert="true" helper="clone" cursor="move"/>
    </p:dataList>
</div>
    
<pe:timeline id="timeline" value="#{dndTimelineController.model}" var="event"
             editable="true" eventMargin="10" eventMarginAxis="0" minHeight="250"
             start="#{dndTimelineController.start}" end="#{dndTimelineController.end}"
             timeZone="#{dndTimelineController.localTimeZone}"
             style="margin-left:135px;" snapEvents="false" showNavigation="true"
             dropActiveStyleClass="ui-state-highlight" dropHoverStyleClass="ui-state-hover">
    <p:ajax event="drop" listener="#{dndTimelineController.onDrop}" global="false" update="eventsList"/>
    
    <h:outputText value="#{event.name}"/>
    ...  other properties can be displayed too
</pe:timeline>
In this example, the objects in the list (on the left side) have properties name, start date, end date.
public class Event implements Serializable {

    private String name;
    private Date start;
    private Date end;

    // constructors, getter / setter
    ...

    @Override
    public boolean equals(Object o) {
        if (this == o) {
            return true;
        }

        if (o == null || getClass() != o.getClass()) {
            return false;
        }

        Event event = (Event) o;

        if (name != null ? !name.equals(event.name) : event.name != null) {
     return false;
        }

        return true;
    }

    @Override
    public int hashCode() {
        return name != null ? name.hashCode() : 0;
    }
}
The bean class defines the AJAX listener onDrop. The listener gets an instance of the class TimelineDragDropEvent. Besides start / end date and group, this event object also contains a client ID of the dragged component and dragged model object if draggable item is within a data iteration component.
public class DndTimelineController implements Serializable {

    private TimelineModel model;
    private TimeZone localTimeZone = TimeZone.getTimeZone("Europe/Berlin");
    private List<Event> events = new ArrayList<Event>();

    @PostConstruct
    protected void initialize() {
        // create timeline model
        model = new TimelineModel();

        // create available events for drag-&-drop
        for (int i = 1; i <= 13; i++) {
            events.add(new Event("Event " + i));
        }
    }

    public void onDrop(TimelineDragDropEvent e) {
        // get dragged model object (event class) if draggable item is within a data iteration component,
        // update event's start / end dates.
        Event dndEvent = (Event) e.getData();
        dndEvent.setStart(e.getStartDate());
        dndEvent.setEnd(e.getEndDate());

        // create a timeline event (not editable)
        TimelineEvent event = new TimelineEvent(dndEvent, e.getStartDate(), e.getEndDate(), false, e.getGroup());

        // add a new event
        TimelineUpdater timelineUpdater = TimelineUpdater.getCurrentInstance(":mainForm:timeline");
        model.add(event, timelineUpdater);

        // remove from the list of all events
        events.remove(dndEvent);

        FacesMessage msg = new FacesMessage(FacesMessage.SEVERITY_INFO,
                                            "The " + dndEvent.getName() + " was added", null);
        FacesContext.getCurrentInstance().addMessage(null, msg);
    }

    public TimelineModel getModel() {
        return model;
    }

    public TimeZone getLocalTimeZone() {
        return localTimeZone;
    }

    public List<Event> getEvents() {
        return events;
    }

    public Date getStart() {
        return start;
    }

    public Date getEnd() {
        return end;
    }
}
Please also consider the drag-and-drop related attributes dropHoverStyleClass, dropActiveStyleClass, dropAccept, dropScope. They are similar to corresponding attributes in p:droppable. There is only one difference - the datasource attribute is not needed. p:droppable in PrimeFaces has this attribute which represents an ID of an UIData component to connect with. I have never understood why we need this. It is possible to get the UIData component with a simple trick. The reading below is for advanced developers.

The drop callback from the jQuery Droppable gets an ui object with a reference to the draggable element. So we can look for a closest DOM element which is a container for an UIData component.
var params = [];

// Check if draggable is within a data iteration component.
// Note for PrimeFaces team: an additional unified style class ".ui-data" for all UIData components would be welcome here!
var uiData = ui.draggable.closest(".ui-datatable, .ui-datagrid, .ui-datalist, .ui-carousel");
if (uiData.length > 0) {
    params.push({
        name: this.id + '_uiDataId',
        value: uiData.attr('id')
    });
}

params.push({
    name: this.id + '_dragId',
    value: ui.draggable.attr('id')
});

// call the drop listener
this.getBehavior("drop").call(this, evt, {params: params, ...});
In the component itself, the current dragged object is extracted by this snippet
FacesContext context = FacesContext.getCurrentInstance();
Map<String, String> params = context.getExternalContext().getRequestParameterMap();
String clientId = this.getClientId(context);

Object data = null;
String dragId = params.get(clientId + "_dragId");
String uiDataId = params.get(clientId + "_uiDataId");

if (dragId != null && uiDataId != null) {
    // draggable is within a data iteration component
    UIDataContextCallback contextCallback = new UIDataContextCallback(dragId);
    context.getViewRoot().invokeOnComponent(context, uiDataId, contextCallback);
    data = contextCallback.getData();
}

TimelineDragDropEvent te = new TimelineDragDropEvent(this, behaviorEvent.getBehavior(), ... dragId, data);
The JSF standard method invokeOnComponent does the job. Now the data object is available in TimelineDragDropEvent. The class UIDataContextCallback is a simple implementation of the JSF ContextCallback interface.
public class UIDataContextCallback implements ContextCallback {

    private String dragId;
    private Object data;

    public UIDataContextCallback(String dragId) {
        this.dragId = dragId;
    }

    public void invokeContextCallback(FacesContext fc, UIComponent component) {
        UIData uiData = (UIData) component;
        String[] idTokens = dragId.split(String.valueOf(UINamingContainer.getSeparatorChar(fc)));
        int rowIndex = Integer.parseInt(idTokens[idTokens.length - 2]);
        uiData.setRowIndex(rowIndex);
        data = uiData.getRowData();
        uiData.setRowIndex(-1);
    }

    public Object getData() {
        return data;
    }
}

Thursday, October 3, 2013

PrimeFaces Extensions 1.0.0 released

We are glad to announce the final release 1.0.0 of PrimeFaces Extensions. The full list of closed issues is on the GitHub. This release is fully compatible with the PrimeFaces 4.0 which was also released today.

Now both, PrimeFaces and PrimeFaces Extensions are in the Maven central repo. See Getting Started how to use it.

Thanks to all for contribution.