Sunday, January 25, 2015

PrimeFaces: Opening external pages in dynamically generated dialog

I already blogged about one recipe in the upcomming 2. edition of the PrimeFaces Cookbook. In this post, I would like to post the second recipe about a small framework called Dialog Framework. I personally like it because I remember my costly effort to do the same thing with the Struts Framework. When you wanted to load an external page into a popup and submit some data to this page, you had to call window.open with an hidden form, set passed values into hidden fields, submit the form to the external page via JavaScript and wait until the page is ready to use in window.onload or document.ready. A lot of manuelly work. PrimeFaces does this job for you and, in addition, provides with p:dialog a beautiful user interface as replacement for popup.

The regular usage of PrimeFaces' dialog is a declarative approach with p:dialog. Beside this declarative approach, there is a programmatic approach as well. The programmatic approach is based on a programmatic API where dialogs are created and destroyed at runtime. It is called Dialog Framework. The Dialog Framework is used to open external pages in dynamically generated dialog. The usage is quite simple, RequestContext provide two methods: openDialog and closeDialog that allow opening and closing dynamic dialogs. Furthermore, the Dialog Framework makes possible to pass data back from the page displayed in the dialog to the caller page.

In this recipe, we will demonstrate all features available in the Dialog Framework. We will open a dialog with options programmatically and pass parameters to the page displayed in this dialog. We will also meet the possibility for communicating between the source (caller) page and the dialog.

Getting ready

Dialog Framework requires the following configuration in faces-config.xml:
<application>
    <action-listener>org.primefaces.application.DialogActionListener</action-listener>
    <navigation-handler>org.primefaces.application.DialogNavigationHandler</navigation-handler>
    <view-handler>org.primefaces.application.DialogViewHandler</view-handler>
</application>

How to do it...

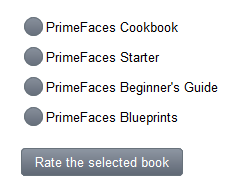
We will develop a page with radio buttons to select one available PrimeFaces' book for rating. The rating itself happens in a dialog after a click on the button Rate the selected book.

The XHTML snippet to the screenshot is listed below.
<p:messages id="messages" showSummary="true" showDetail="false"/>

<p:selectOneRadio id="books" layout="pageDirection" value="#{dialogFrameworkBean.bookName}">
    <f:selectItem itemLabel="PrimeFaces Cookbook" itemValue="PrimeFaces Cookbook"/>
    <f:selectItem itemLabel="PrimeFaces Starter" itemValue="PrimeFaces Starter"/>
    <f:selectItem itemLabel="PrimeFaces Beginner's Guide" itemValue="PrimeFaces Beginner's Guide"/>
    <f:selectItem itemLabel="PrimeFaces Blueprints" itemValue="PrimeFaces Blueprints"/>
</p:selectOneRadio>

<p:commandButton value="Rate the selected book"
            process="@this books"
            actionListener="#{dialogFrameworkBean.showRatingDialog}"
            style="margin-top: 15px">
    <p:ajax event="dialogReturn" update="messages" listener="#{dialogFrameworkBean.onDialogReturn}"/>
</p:commandButton>
The page in the dialog is a full page bookRating.xhtml with a Rating component p:rating. It also shows the name of the book selected for rating.
<!DOCTYPE html>
<html xmlns="http://www.w3.org/1999/xhtml"
      xmlns:f="http://xmlns.jcp.org/jsf/core"
      xmlns:h="http://xmlns.jcp.org/jsf/html"
      xmlns:p="http://primefaces.org/ui">
<f:view contentType="text/html" locale="en">
    <f:metadata>
        <f:viewParam name="bookName" value="#{bookRatingBean.bookName}"/>
    </f:metadata>
    <h:head>
        <title>Rate the book!</title>
    </h:head>
    <h:body>
        <h:form>
            What is your rating for the book <strong>#{bookRatingBean.bookName}</strong>?

            <p/>

            <p:rating id="rating">
                <p:ajax event="rate" listener="#{bookRatingBean.onrate}"/>
                <p:ajax event="cancel" listener="#{bookRatingBean.oncancel}"/>
            </p:rating>
        </h:form>
    </h:body>
</f:view>
</html>
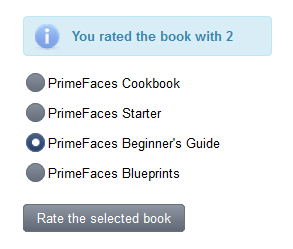
The next screenshot demonstrates how the dialog looks like.


A click on a rating star or the cancel symbol closes the dialog. The source (caller) page displays a message with the selected rating value in the range from 0 till 5.

The most interesting part is the logic in beans. The bean DialogFrameworkBean opens the rating page within the dialog by invoking the method openDialog() with the outcome, options and POST parameters on a RequestContext instance. Furthermore, the bean defines an AJAX listener onDialogReturn() which is invoked when the data (selected rating) is returned from the dialog after it was closed.
@Named
@ViewScoped
public class DialogFrameworkBean implements Serializable {

    private String bookName;

    public void showRatingDialog() {
        Map<String, Object> options = new HashMap<String, Object>();
        options.put("modal", true);
        options.put("draggable", false);
        options.put("resizable", false);
        options.put("contentWidth", 500);
        options.put("contentHeight", 100);
        options.put("includeViewParams", true);

        Map<String, List<String>> params = new HashMap<String, List<String>>();
        List<String> values = new ArrayList<String>();
        values.add(bookName);
        params.put("bookName", values);

        RequestContext.getCurrentInstance().openDialog("/views/chapter11/bookRating", options, params);
    }

    public void onDialogReturn(SelectEvent event) {
        Object rating = event.getObject();
        FacesMessage message = new FacesMessage(FacesMessage.SEVERITY_INFO, "You rated the book with " + rating, null);

        FacesContext.getCurrentInstance().addMessage(null, message);
    }

    // getters / setters
    ...
}
The bean BookRatingBean defines two listeners for the Rating component. They are invoked when the user clicks on a star and the cancel symbol respectively. We call there closeDialog() on a RequestContext instance to trigger the dialog closing and to pass the current rating value to the mentioned listener onDialogReturn().
@Named
@RequestScoped
public class BookRatingBean {

    private String bookName;

    public void onrate(RateEvent rateEvent) {
        RequestContext.getCurrentInstance().closeDialog(rateEvent.getRating());
    }

    public void oncancel() {
        RequestContext.getCurrentInstance().closeDialog(0);
    }

    // getters / setters
    ...
}

How it works...

The RequestContext provides two methods of the same name openDialog to open a dialog dynamically at runtime. The first one only has one parameter - the logical outcome used to resolve a navigation case. The second one has three parameters - outcome, dialog's configuration options and parameters that are sent to the view displayed in the dialog. We used the second variant in the example. The options are put into a Map as key, value pairs. The parameters are put into a Map too. In our case, we put the name of the selected book. After that, the name is received in the dialog's page bookRating.xhtml via the f:viewParam. f:viewParam sets the transferred parameter into the BookRatingBean, so that it is available in the heading above the Rating component. Tip: Please refer the PrimeFaces User's Guide to see a full list of supported dialog's configuration options.

Let us go through the request-response life cycle. Once the response is received from the request caused by the command button, a dialog gets created with an iframe inside. The URL of the iframe points to the full page, in our case bookRating.xhtml. The page will be streamed down and shown in the dialog. As you can see, there are always two requests: the first initial POST and the second GET sending by iframe. Note that the Dialog Framework only works with initial AJAX requests. Non-AJAX request are ignored. Please also note the the title of the dialog is taken from the HTML title element.

As we already mentioned above, the dialog can be closed programmatically by invoking the method closeDialog on a RequestContext instance. On the caller page, the button that triggers the dialog needs to have an AJAX listener for the dialogReturn event to be able to receive any data from the dialog. The data is passed as parameter to the method closeDialog(Object data). In the example, we pass either a positive integer value rateEvent.getRating() or 0.

Friday, January 2, 2015

Extending PrimeFaces CSV with Bean Validation

Some of you already know that me and my co-author Mert Çalışkan are working on the 2. edition of the PrimeFaces Cookbook. The Packt Publishing allowed me to publish a small excerpt from one recipe of the new chapter "Client Side Validation". It would help in letting the readers know about the book's content. In this blog post, I would like to discuss the extending PrimeFaces Client Side Validation (CSV) with Bean Validation.

Bean Validation is a validation model available as part of Java EE 6 platform, which allows the validation by constraints in the form of annotations placed on a field, method, or class. JSF 2.2 supports the validation placed on fields (properties and their getters / setters) in managed beans, as well as Spring or CDI beans. The validation on class level is not supported yet, as long you do not use utilities such as OmniFaces.

PrimeFaces’ CSV has a built-in integration with Bean Validation. Constraints defined with annotations can be validated on the client-side by the CSV framework. Though the Bean Validation API defines a whole set of standard constraint annotations one can easily think of situations in which these standard annotations will not suffice. For these cases, you are able to create custom constraints for specific validation requirements. Client Side Validation API in PrimeFaces works seamlessly with custom constraints.

In this recipe, we will develop a special custom constraint and validators for validating a card verification code (CVC). CVC is used as security feature with bank card number. It is a number with a length between three and four digits. For instance, MasterCard or Visa require three digits and American Express requires four digits. Therefore, the CVC validation will depend on the selected bank card. User can select a bank card by a p:selectOneMenu, type a CVC into a p:inputText and submit the inputs after that.

How to do it...

We will start with a custom annotation used for CVC field.
import org.primefaces.validate.bean.ClientConstraint;
import javax.validation.Constraint;
import javax.validation.Payload;
import java.lang.annotation.Retention;
import java.lang.annotation.RetentionPolicy;
import java.lang.annotation.Target;
import static java.lang.annotation.ElementType.FIELD;
import static java.lang.annotation.ElementType.METHOD;

@Constraint(validatedBy = CvcConstraintValidator.class)
@ClientConstraint(resolvedBy = CvcClientConstraint.class)
@Target({FIELD, METHOD})
@Retention(RetentionPolicy.RUNTIME)
public @interface ValidCVC {

    String message() default "{invalid.cvc.message}";

    Class<?>[] groups() default {};

    Class<? extends Payload>[] payload() default {};
    
    // identifier of the select menu with cards
    String forCardMenu() default "";
}
@Constraint is a regular annotation from the Bean Validation API and @ClientConstraint is one from the PrimeFaces CSV Framework, which helps to resolve metadata. The developed annotation defines the message key invalid.cvc.message and has the custom property forCardMenu. The value of this property is any search expression in terms of PrimeFaces Selectors (PFS) to reference the select menu with bank cards. This is necessary because the valid CVC value depends on the selected card.

The goal of CvcConstraintValidator is the validation of the input length.
public class CvcConstraintValidator implements ConstraintValidator<ValidCVC, Integer> {

    @Override
    public void initialize(ValidCVC validCVC) {
    }

    @Override
    public boolean isValid(Integer cvc, ConstraintValidatorContext context) {
        if (cvc == null || cvc < 0) {
            return false;
        }

        int length = (int) (Math.log10(cvc) + 1);
        return (length >= 3 && length <= 4);
    }
}
The goal of the CvcClientConstraint is the preparing of metadata.
public class CvcClientConstraint implements ClientValidationConstraint {

    private static final String CARDMENU_METADATA = "data-forcardmenu";

    @Override
    public Map<String, Object> getMetadata(ConstraintDescriptor constraintDescriptor) {
        Map<String, Object> metadata = new HashMap<String, Object>();
        Map attrs = constraintDescriptor.getAttributes();
        String forCardMenu = (String) attrs.get("forCardMenu");
        if (StringUtils.isNotBlank(forCardMenu)) {
            metadata.put(CARDMENU_METADATA, forCardMenu);
        }

        return metadata;
    }

    @Override
    public String getValidatorId() {
        return ValidCVC.class.getSimpleName();
    }
}
Let us go to the client-side implementation. First, we have to create a JavaScript file, say validators.js, and register there our own validator in the namespace PrimeFaces.validator with the name ValidCVC. This name is an unique ID returned by the method getValidatorId() (see the class CvcClientConstraint). The function to be implemented is called validate(). It has two parameters: the element itself and the current input value to be validated.
PrimeFaces.validator['ValidCVC'] = {
    MESSAGE_ID: 'invalid.cvc',

    validate: function (element, value) {
        // find out selected menu value
        var forCardMenu = element.data('forcardmenu');
        var selOption = forCardMenu ?
            PrimeFaces.expressions.SearchExpressionFacade.
                resolveComponentsAsSelector(forCardMenu).find("select").val() : null;

        var valid = false;
        if (selOption && selOption === 'MCD') {
            // MasterCard
            valid = value > 0 && value.toString().length == 3;
        } else if (selOption && selOption === 'AMEX') {
            // American Express
            valid = value > 0 && value.toString().length == 4;
        }

        if (!valid) {
            throw PrimeFaces.util.ValidationContext.
                getMessage(this.MESSAGE_ID);
        }
    }
};
Second, we have to create a JavaScript file for localized messages, e.g. lang_en.js.
PrimeFaces.locales['en'] = {
    messages : PrimeFaces.locales['en_US'].messages
};

$.extend(PrimeFaces.locales['en'].messages, {
    ...
 
    'invalid.cvc':
        'Card Validation Code is invalid'
});
The bean has two required properties annotated with @NotNull. In addition, the property cvc is annotated with our custom annotation @ValidCVC. The value of the attribute forCardMenu points to the style class of the p:selectOneMenu that lists available bank cards.
@Named
@ViewScoped
public class ExtendCsvBean implements Serializable {

    @NotNull
    private String card;
    @NotNull
    @ValidCVC(forCardMenu = "@(.card)")
    private Integer cvc;

    public void save() {
        RequestContext.getCurrentInstance().execute("alert('Saved!')");
    }
 
    // getters / setters
    ...
}
In the XHTML fragment, we have a select menu with two bank cards and an input field for CVC. The p:commandButton validates the fields and executes the method save() on postback.
<h:panelGrid id="pgrid" columns="3" cellpadding="3" style="margin-bottom:10px;">
    <p:outputLabel for="card" value="Card"/>
    <p:selectOneMenu id="card" styleClass="card"
                     value="#{extendCsvBean.card}">
        <f:selectItem itemLabel="Please select a card"
                      itemValue="#{null}"/>
        <f:selectItem itemLabel="MasterCard"
                      itemValue="MCD"/>
        <f:selectItem itemLabel="American Express"
                      itemValue="AMEX"/>
    </p:selectOneMenu>
    <p:message for="card"/>

    <p:outputLabel for="cvc" value="CVC"/>
    <p:inputText id="cvc" value="#{extendCsvBean.cvc}"/>
    <p:message for="cvc"/>
</h:panelGrid>

<p:commandButton validateClient="true" value="Save"
                 process="@this pgrid" update="pgrid" action="#{extendCsvBean.save}"/>
Note: As you can see, neither p:selectOneMenu nor p:inputText specifies the required attribute. We can achieve the transformation of the @NotNull annotation to the required attribute with the value true if we set the context parameter primefaces.TRANSFORM_METADATA to true.

In the last step, all required JavaScript files have to be included on the page.
<h:outputScript library="js" name="chapter10/lang_en.js"/>
<h:outputScript library="js" name="chapter10/validators.js"/>
The next two pictures show what happens when validations fails


If everything is ok, an alert box with the text Saved! is displayed to user.


How it works...

The message key invalid.cvc.message and the text should be put in resource bundles named ValidationMessages, e.g. ValidationMessages_en.properties. ValidationMessages is the standard name specified in the Bean Validation specification. The property files should be located in the application classpath and contain the following entry: invalid.cvc.message=Card Validation Code is invalid. This configuration is important for the server-side validation.

The method getMetadata() in the class CvcClientConstraint provides a map with name, value pairs. The metadata are exposed in the rendered HTML. The values can be accessed on the client-side via element.data(name), where element is an jQuery object for the underlying native HTML element. The CVC field with the metadata is rendered as
<input type="text" data-forcardmenu="@(.card)"
       data-p-con="javax.faces.Integer" data-p-required="true"...>
The most interesting part is the implementation of the client-side validator. The value to be validated is already numeric because first it gets converted by the PrimeFaces’ built-in client-side converter for the data type java.lang.Integer. We only have to check if the value is positive and has a valid length. A valid length depends on the selected card in the menu p:selectOneMenu that can be accessed by the PrimeFaces JavaScript API as PrimeFaces.expressions.SearchExpressionFacade.resolveComponentsAsSelector(selector), where selector is any PrimeFaces selector, in our case @(.card). If the validation fails, we throw an exception by invoking throw PrimeFaces.util.ValidationContext.getMessage(text, parameter).

The client-side validation is triggered by setting validateClient=”true” on the p:commandButton.