CommonJS' modules can be loaded on demand with require.ensure(...). Example:
require.ensure(["module-a"], function(require) {
    var a = require("module-a");
    // module-a can be used now ...
});
The well-known module bundler Webpack supports this syntax for loading modules on demand. Such lazy loaded module(s) define a split point. Split points split the codebase into "chunks" (separate JavaScript files) which are loaded on demand. This feature allows to keep the initial download small and only download the code when it's requested.Webpack performs a static analysis of the code at the project build time. Dynamic information is only available at runtime and not available at build time. You have to define your modules as constants. This leads to the problem. The following code will not work:
var modA = "module-a";
require.ensure([modA], function(require) {
    var a = require("module-a");
    // module-a can be used now ...
});
Webpack says something like: Error: Module not found. A dependency to an entry point is not allowed.Theoretically you can use require.context, but this needs some parts of module's path as constants too. Now, imagine you develop a modular UI library and would like to provide some callbacks for certain events (event handlers). Users of your library use it as a third-party library. They want to register their custom callback functions from their own modules. And they want to be called lazy, on demand, when an event occurs. You have many users and your library doesn't know about custom modules of course. That means, you can not hard-code module's path and function's name a priori. What to do?
Solution
This POC on GitHub demonstrates how to use truly dynamic require with webpack. It simulates third-party and own modules. The project structure:
index.html          // some HTML template from the third-party UI library
external-modules    // third-party library with CommonJS modules
own-modules         // some library with CommonJS modules which uses the third-party library
common-modules      // simple utility modules
The modules in external-modules don't know about own-modules. Modules in the own-modules import modules from the external-modules. The most important webpack loader we use in this POC is bundle loader for webpack. This loader creates a special function with required module which can be executed lazily. The required module gets loaded when the function is executed.
The HTML template in the POC, backed by the third-party (external) modules, look like as follows (only short snippet):
<button data-init="button" data-onclick='["ownModules.button", "alertSync"]'>
    Try sync. call (ok)
</button>
<p></p>
<button data-init="button" data-onclick='["ownModules.button", "alertAsyncValid"]'>
    Try async. call (ok)
</button>
<p></p>
<button data-init="button" data-onclick='["ownModules.button", "alertAsyncInvalid"]'>
    Try async. call (error)
</button>
The full code can be found in index.xhtml. The callback functions are defined as values of data-* attributes. Example: data-onclick='["ownModules.button", "alertSync"]'. Here, the function alertSync from the namespace ownModules.button wants to be called when the button is clicked. The namespace is a simple JavaScript object defined in the global window scope.The module's functions in the folder own-modules returns Promises. Promises allow asynchronous callbacks. In the POC, the NPM module promise light is used. If you have jQuery in your web app, you can use jQuery Deferred Object as well because it provides the same functionality. The sample implementation of the button.js looks like as
var Promise = require('promise-light');

module.exports = {
    alertSync: function (element) {
        document.getElementById('output').innerHTML = 'Clicked button. Sync. call is OK';
        return Promise.resolve('OK');
    },

    alertAsyncValid: function (element) {
        return new Promise(function setup(resolve, reject) {
            setTimeout(function () {
                document.getElementById('output').innerHTML = 'Clicked button. Async. call is OK';
                resolve('OK');
            }, 1000);
        });
    },

    alertAsyncInvalid: function (element) {
        return new Promise(function setup(resolve, reject) {
            setTimeout(function () {
                document.getElementById('output').innerHTML = 'Clicked button. Async. call has ERROR';
                reject('ERROR');
            }, 1000);
        });
    }
};
The external modules should be bootstrapped by the own modules. The bootstrapping occurs in the file entry.js which acts as an entry point in the webpack configuration.
var objectifier = require("./../common-modules/objectifier");
var bootstrap = require("./../external-modules/bootstrap");

document.addEventListener("DOMContentLoaded", function (event) {
    // initialize external modules
    bootstrap.bootstrap();

    // lazy load own modules (s. https://github.com/webpack/bundle-loader)
    var lazyLoadedButton = require("bundle?lazy!./button");
    var lazyLoadedCheckbox = require("bundle?lazy!./checkbox");

    // and put them under namespaces ownModules.button and ownModules.checkbox resp.
    objectifier.set('ownModules.button', lazyLoadedButton);
    objectifier.set('ownModules.checkbox', lazyLoadedCheckbox);
});
As you can see, the bundle loader is applied to the own modules. The returned functions are saved under arbitrary namespaces in order to be executed later in external modules. Note: the objectifier is just a CommonJS module porting of the beautiful getter and setter implementation for nested objects.
The button.js in the external-modules registers an onlick event handler for all HTML elements having the data-init="button" attribute.
var lazyloader = require("./lazyloader");

module.exports = {
    init: function () {
        var elements = document.querySelectorAll('[data-init="button"]');
        for (var i = 0; i < elements.length; i++) {
            (function () {
                var element = elements[i];

                // onlick event handler
                var onclick = function () {
                    // so something module specific ...

                    // execute function defined via data-onclick attribute if it's defined,
                    // e.g. data-onclick='["ownModules.button", "alertSync"]'
                    lazyloader.execute(element, 'data-onclick',
                        function resolved(value) {
                            alert(value);
                        }, function rejected(error) {
                            alert(error);
                        });
                };

                element.addEventListener("click", onclick);
            })();
        }

        return elements;
    },

    doSomething: function () {
        // ...
    }
};
The core logic for the event handling is encapsulated in the lazyloader.js.
/**
 Loads modules specified via data-* attributes and executes the specified function.
 HTML-Example:

 <button data-init="button" data-onclick='["ownModules.button", "alertSync"]'>
    ...
 </button>

 The function ownModules.button.alertSync(button) will be executed.
 */

var objectifier = require("./../common-modules/objectifier");

module.exports = {
    /**
     * Executes the specified synchronous or asynchronous function from the specified module
     * and invokes resolved or rejected callbacks respectively.
     * The function should return a promise.
     *
     * @param element HTML element where data-* is defined
     * @param data value of data-* as string
     * @param resolvedCallback callback which gets executed when the returned promise is fullfilled
     * @param rejectedCallback callback which gets executed when the returned promise is rejected
     */
    execute: function (element, data, resolvedCallback, rejectedCallback) {
        var strData = element.getAttribute(data);
        if (strData) {
            var objData = JSON.parse(strData);
            var module = objData[0];
            var func = objData[1];

            if (module && objectifier.exists(module) && func) {
                // module and function exist ==> load the module
                objectifier.get(module)(function (module) {
                    // execute the specified function from the module.
                    // return value is a promise (see https://www.npmjs.com/package/promise-light)
                    module[func](element).then(
                        function resolved(value) {
                            resolvedCallback(value);
                        },
                        function rejected(error) {
                            rejectedCallback(error);
                        });
                });
            }
        }
    }
};
It executes the specified function from the specified module. The caller receives a promise. If the promise gets resolved, the first function in .then(...) is executed. If the promise gets rejected, the second function in .then(...) is executed. The synchronous or asynchronous function from the own modules can control whether it resolves or rejects the promise. The caller can decide then what it should do in both cases. For instance, assume you got an accordion widget which belongs to a third-party library. One interesting case could be the validation of the content of an open accordion tab when the tab's header is clicked by the user. A custom function could validate the tab content on such click. In case of a successful validation, the clicked tab can be closed. Otherwise, the tab should stay open.Screens
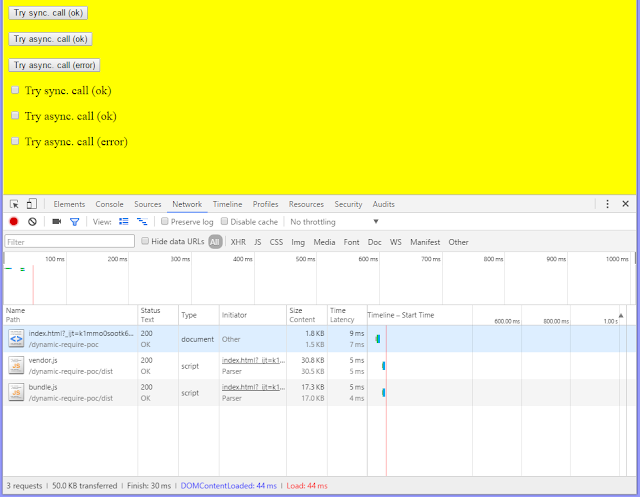
The initial load doesn't fetch chunks from the own modules.
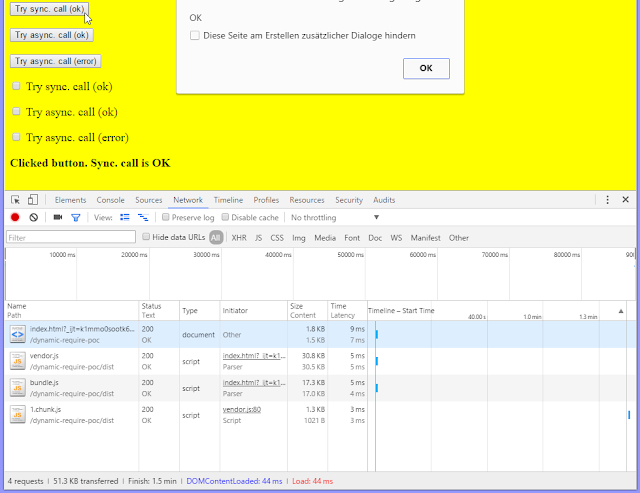
Click on a button triggers the load of the first chunk.
Click on a checkbox triggers the load of the second chunk.


